
The Virtual Pinball Machine
Installing the Components
"Some assembly required" doesn't begin to cover the next couple of steps, which start with a lot of drilling and mounting of components.
Rails
My cabinet didn't have the top rails on it when I bought it. This particular cabinet needed wide rails that extend partially down the side (with holes for the flipper buttons). These are not uncommon on older games, but they're not particularly easy to find today.
Luckily John, the repair tech who works my games, was parting out a pinball machine with the exact rails I needed. He sold them (and the plastic tracks that sit under the rails to hold the glass in place) for $30. They were originally installed using nails, but I decided to use screws instead. That'll make it easier to remove the rails should I ever have to do so.

Fans
Pinball machines don't have cooling fans, but they don't produce a lot of heat like LCD monitors do, especially when placed under glass.
My cooling solution was three 120 mm PC cooling fans. I used a 4-inch hole saw to cut two holes in the back of the cabinet and one in the bottom where the coin box would normally sit near the front and used long wood screws to mount the fans on the inside of the holes. I installed fan grills on the outside to keep fingers and other objects out of the blades.
The fan in the bottom pulls air into the cabinet and the two fans in the back pull air out. The back door is vented, as is the bottom of the cabinet. In addition, the computer case I bought has an inflow and an outflow fan.
This should (hopefully) be enough to ensure that nothing overheats. (2019 note: No overheat problems, so I guess three fans are sufficient.)


Digital Plunger
There have been a number of styles of pinball plungers on cabinets throughout the years. Luckily, my cabinet had the most popular design--the same one upon which the NanoTech plunger is designed. No drilling required.
However, the original plunger in the cabinet was held in place by three bolts that passed through a metal plate that slid over the shaft of the plunger on the inside of the cabinet. The NanoTech plunger doesn't come with such a plate (or the mounting bolts, for that matter). The good news is that the bolts fit the NanoTech mounting holes. The bad news is that the NanoTech plunger's shaft is larger in diameter, so it doesn't fit through the original mounting plate.
So, I improvised. I bought some flat metal brackets and put the original bolts through the brackets and into the NanoTech plunger housing. I then used wood screws to secure the brackets to the cabinet. It might not be a pretty solution, but it works perfectly. Anyway, it's not like you can tell from the outside.

Buttons
The number of buttons you put on your cabinet is a personal choice. I chose to put the fewest number of buttons necessary on mine rather than festooning it with tons of buttons that would hardly ever get used.
Buttons are easy to install--just drill the right size hole (one that's big enough to accommodate the body of the button but not too so big that the flared portion will go through it--I use the oh-so-scientific method of holding up the spade bit next to the button and eyeballing it), remove the switch (for micro-switch buttons), slide the button into the hole, put the nut on the button and tighten it with a button wrench (available just about anyplace that sells buttons), and snap the switch back on.
I have the following buttons on my machine:

I used the original flipper buttons with new leaf switches.

I used the original flipper buttons with new leaf switches.
-
Flipper Buttons (2): I wanted to use leaf switch flipper buttons on my cabinet--that's what real pinball machines use, and I wanted mine to feel real. I purchased some nice buttons and leaf switches from VirtuaPin but, because of the metal side rails on my cabinet, they wouldn't fit. (The holes in the rails are too small and I don't have any good way to drill them out.) I opted to use the original flipper buttons from the cabinet with the new leaf switches. I had to remove the new switches from their plastic mounts and screw them directly to the cabinet (like the originals). I used some of the spacers from the original switches to ensure that the buttons worked properly.
-
Magna-Save Buttons (2): These are used by a handful of machines for a ball save feature. They are generally mounted just forward of the flipper buttons, but my metal side rail precluded that. Instead, I mounted them forward of the flippers just below the rail. I used standard arcade micro-switch buttons for these.
-
Start/Coin/Exit: I wanted these three buttons to be lighted. It's not strictly necessary--just kind of cool looking. I chose Ultimarc's Ultralux Chrome LED buttons for these.
-
Start (Yellow): Starts a game and makes menu selections. I installed this one in the spot where the original cabinet's Start button was located.
-
Coin (Green): Simulates dropping a coin in the coin slot. I mounted this one in line below the Start button.
-
Exit (Red): Pauses and exits a game in progress (brings up the Hyperpin in-game menu) and accesses the Hyperpin exit menu so you can quit to Windows or shut down the machine.
-
-
On/Off Button: A standard arcade button I mounted on the bottom in the location of a normal pinball machine's on/off switch. Switches the computer on (and off--but you really want to shut down properly, not just shut it off).
-
Launch Ball: A large Williams Launch Ball button purchased at Pinball Life. Launches the ball into play. Used on games that don't use plungers and on games that don't have code enabled for the digital plunger.
Controller Board
The NanoTech Mot-Ion controller board has to be mounted flat in the cabinet with the USB connection facing the back of the cabinet in order for the motion detection to function properly. Unfortunately, the wiring harnesses that come with it aren't long enough to reach all of the buttons if the board is mounted on the bottom of the cabinet. (I didn't know about terminator blocks when I was building my machine--I could have used a couple of them and made things a bit neater wiring-wise. Live and learn.)
To solve this problem, I mounted a board at about the same level as the playfield rails in the cabinet using L-brackets. I made sure it was perfectly square with the cabinet so as not to throw off the accelerometer.

The piece of wood I added to mount the controller board.
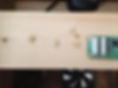

The piece of wood I added to mount the controller board.
There are screw holes in the four corners of the board, but I didn't want to mount it directly to the wood--I wanted to keep the solder side slightly elevated. To do this, I needed board spacers--which, it turns out, aren't easy to obtain, at least locally. What I wanted were just hollow plastic spacers that I could run wood screws through, but I couldn't find any. So, I dug through my dead board box and scavenged four from an old arcade board. After that...four screws and done!
Surge Protector
One of the things I puzzled over as I was planning my game was how to avoid having to turn on three monitors and the computer when I started the game and, then, turn them all off again when I was done. I had this nightmarish vision of a pile of TV remotes lying inside the coin door for this purpose. In all of the virtual pinball build notes I read online, nobody mentioned how they handled this issue.
As I was researching solutions, I came across something called a "smart" surge protector. Designed to save power, these surge protectors have a Control outlet with a number of other outlets that are automatically switched by it. When you switch on the device plugged into the Control outlet, the devices plugged into the auto-switched outlets power up. When you switch off the Control device, power is cut to all of the auto-switched outlets, powering down the other devices.
I chose the Smart Strip LCG3, which has 10 outlets. It's pricey compared to normal surge protectors, but it really is ideal for this purpose.
I mounted the surge protector in the back right corner of the cabinet with wood screws. I drilled a hole through the back of the cabinet and ran the cord through it. I finished off the hole with a plastic computer desk grommet that I bought at Lowes.
Installing the PC
Because the PC is in a case that has to lie on its side in order to fit, there's no way to screw it into the cabinet without drilling holes through the case. Plus, doing that would make it really tough to remove should the need arise.
I was in Lowes trying to figure out something that would hold the PC case in place but still allow me to pull it out when I needed to and I thought to myself, "What I need is some industrial-strength Velcro." At that very moment, I looked at the shelf and saw a box labeled "Industrial Strength Velcro." Who knew?
So, I put two strips of the stuff on the bottom of the cabinet (the soft side of the strip) and stapled it in place (just to give it some extra hold--industrial strength or not, I didn't trust it to stick to bare wood). I affixed the other side of the strips to the case and just pressed it into place. Presto! A nice, firm grip.

monitor sat. The backglass monitor had its speakers built into the bottom, so the bottom edge of the case was about four times as thick as the rest of the TV. I hadn't wanted to uncase it, and luckily I didn't have to--not all the way. The speaker portion of the case was separate from the main case. I DID have to take the whole thing apart to disconnect all of the cables to the controls, the remote sensor, and the speakers, but I was able to put it back together minus the speaker section and keep most of the case intact. I re-tested the fit of the DMD monitor and, now, it sat only an inch or so back from the front of the backglass monitor.
Next, I placed my speaker/DMD panel in the back box. Like the backglass monitor, it fit perfectly. Plus, the channel at the top of the panel was just wide enough for the bottom of the backglass monitor's screen to sit in the groove. I used a pair of L-brackets to secure the panel to the back box.
My plan for mounting the larger monitor was to run a vertical board down the center of the backbox and hang the monitor on the board using a standard low-profile TV wall mount, and it worked perfectly. Between the wall mount and the speaker panel, that monitor isn't moving. After the TV was secured to the board, I used mounting tape to attach the small circuit boards with the TV controls and remote sensor to the mounting board so they weren't just dangling.
With the larger monitor already in place, mounting the DMD monitor was challenging. I made a template of the four screw holes in the back of the DMD monitor and drilled corresponding holes in the wood with the intention of using four screws to mount the monitor. But, because I SUCK at woodworking, I drilled in the wrong places. Rather than turn the board into Swiss cheese, I decided to run a single screw through the one hole that lined up and use some of my industrial strength Velcro to hold the monitor in place against the board.
Everything looked good except that you could see into the backbox along the edges of the DMD monitor. I came up with a nice, low-tech solution for this--garage door weather stripping. I cut a length for each side of the monitor and stuck it in place using mounting tape. I used another strip along the bottom edge of the speaker panel, where there was a small space between it and the bottom of the back box. It sounds kind of sketchy, I know--but it honestly looks fine. You can't even tell what it is.
After both monitors were securely mounted, I attached the back box onto the main body of the machine.


Backglass and DMD Monitors
I couldn't have been happier with my backglass monitor choice. It fit perfectly. (I know I mentioned that earlier, but it bears repeating.)
I started the mounting process by test-fitting the monitor into the backbox with the front frame of the backbox attached. It fit PERFECTLY into the groove that previously held the backglass of the pinball machine. PERFECTLY.
Then, I test-fitted the 15" monitor I was using for the DMD. My play was to mount this at the very bottom of the back box and let the top part of monitor sit behind the backglass monitor, overlapping it from behind.
I was a little discouraged when I saw how far back the DMD
Speakers and Sub Woofer
The speakers I used are small cube speakers that plug into a sub woofer. The cube speakers are made to be hung on a wall, so I took advantage of that--I ran a horizontal board across the backbox at the level of the openings in the speaker panel and hung the speakers from wood screws on the board. Just to keep them from moving around, I put a strip of mounting tape on the back of each of them.
The speakers are white, and painting the fronts of them black didn't work very well, so I had to come up with a way to hide them. We had some ornamental metal screening in the garage, so I cut two 4" pieces and screwed them into the back of the speaker panel, one over each opening. It's not an ideal solution, but it doesn't look too bad.

The sub woofer is also the power source for the speakers in addition to providing a bass boost. I put it in the back left corner of the cabinet (facing the back so that the cable connections were easy to get to. I attached it to the bottom of the cabinet using a couple more strips of my industrial-strength Velcro. I plugged the speakers into the sub woofer, and plugged the power into one of the auto-switching outlets on my surge protector. Finally, I ran the volume control (which has a long cable on it) to the front of the cabinet and used mounting tape to attach it just inside the coin door, where I can easily reach it.
Playfield Monitor
Installing the playfield monitor was, honestly, the task I dreaded the most. I think I was bothered by the idea of disassembling a perfectly good television. I was also worried about how to mount the TV in the cabinet.
Turns out that taking apart an LCD television is pretty simple. There are a whole bunch of screws, but they're easy to access. (A couple of mine were under "Warranty Void If Removed" stickers--no turning back after you peel off those puppies.) After the screws are all removed, you can pretty much just lift off the back of the case. Just take it apart slowly. Depending on the design of the TV, there could be control panels and other wires (including the power cord) that need to be detached. Just don't force it and you'll be fine.


I couldn't resist firing it up to see how it looked.
After the back is off, you can just lift the guts of the TV out (again--take it slowly so as not to break any components). You'll need to disconnect the speaker wires either from the speaker end or (preferably) from the circuit board--they're probably just plugged in with a molex connector--mine were.
When the TV is un-cased, use electrical tape to secure any loose wires, including the control panel and remote sensor. Because my TV doesn't automatically activate when it senses a video signal, I needed to have my control panel accessible--so I left my control panel cable loose so that I could mount near the front of the cabinet.
A 37" TV, when un-cased, fits PRECISELY width-wise in a standard pinball cabinet (in this particular one, at least). When I test-fitted it, it sat perfectly on the rails. Except for the fact that the bottom edge of the TV's frame was about an inch thinner than the top, which made it sit at an angle. I found a perfect piece of scrap wood to fix this issue--I cut it and used it to build up the rails on the left side of the cabinet.
By the way, make sure you mount the playfield monitor with the bottom of the screen on the left side of the cabinet. Otherwise, your playfield will be upside down.
Before installing the monitor in the cabinet, I needed to do something about the silver metal frame. I had originally thought I would get some black corner molding of some sort and build a frame to cover the metal, but the monitor fit was so tight that I couldn't fit even a super-thin piece of molding on the sides. So, I came up with a super low-tech solution: black duct tape. I carefully applied it all the way around. When I was done, it looked just fine. Under the glass, you can't even tell that it's tape.
Finally, I installed the monitor. My original plan was to build a hinged frame that would allow me to lift the playfield monitor just as you would an actual pinball playfield. However, because the monitor was such a perfect fit, I decided to save myself the trouble and just install it on the rails in the cabinet. I positioned it as close to the front of the cabinet as possible--the plunger prevents it from being more than about 8" from the lock down bar. This works out well, because it leaves a small gap at the back edge to allow some airflow over the screen.
The trickiest part of putting the monitor in the cabinet was balancing it on the cabinet while I connected the power and video cable.
As far as securing it in the cabinet, there was only one hole in the frame through which I could put a wood screw into the side rail...which I did. The single screw holds the monitor in place really well due to the tight fit. It won't slide back and forth, and it can't physically slide side-to-side.


I eventually tightened it up a bit.
Back Door
My cabinet didn't have a door on the back of the back box when I bought it, so I had to make one. Actually, Lowes did most of the work. I bought a piece of 2' x 4' x 1/4" plywood and had it cut to the size I needed. When I got it home, I drilled some holes in it for ventilation and painted it black. I used the thumbscrew things that were originally on the cabinet to hold it in place.
Years later, I've experienced no overheat problems (knock wood), so the ventilation holes are apparently doing the trick.